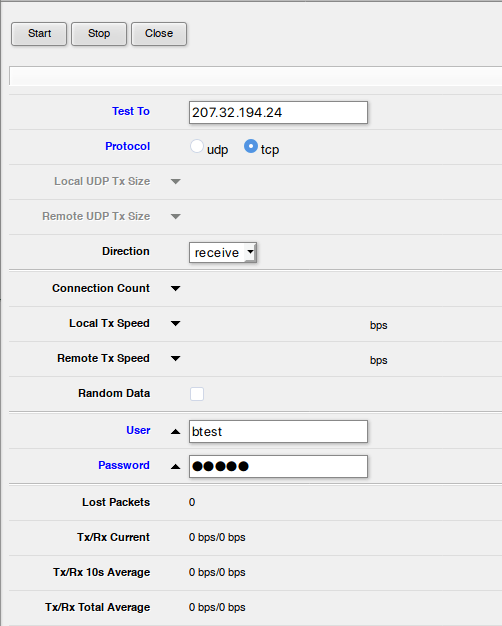
Para acceder a la herramienta de prueba de ancho de banda desde Webmin o Winbox hay que dirigirse a System > Bandwidth Test.
Su uso es bastante simple: se ingresa la IP (v4 o V6), si descarga,
envía o ambos (dirección de datos) y las credenciales (usuario y
contraseña) correspondientes al servidor.
Para utilizar esta herramienta desde la terminal utilizamos el comando bandwidth-test. En el siguiente comando vamos a hacer una prueba por 15 segundos en ambas direcciones.
.gitignore is for ignoring untracked files, but you need to ignore changes in the tracked one. you could use git update-index --skip-worktree /path/to/config.php
I’ve been using bacula for a couple of months now in conjunction with puppet to
make automated backups of all servers that are managed by puppet.
My bacula setup labels a volume for every job it runs with a unique name:
These volumes are automatically purged once the retention of all files contained on the volume expires (which is
configured per-pool). Due to the unique names however, the volumes cannot
be recycled. The result of this is that the volumes that have been marked as
purged in the catalog remain as-is on the disk. After some time this ultimately
resulted in a full disk, thus halting all backups performed on that pool. Not
good. Not good at all.
I thought volumes would be truncated at the time they are marked as purged, but
I probably made some configuration error somewhere along the road or I don’t
quite understand how the truncating process works, because all of my purged
disks are using their original disk space.
Because I’m pressed for time and can’t be bothered with old backups anyway,
I’ve decided to just delete all purged volumes (which were beyond their
retention date anyway). Perhaps the steps I took to delete these
volumes can help others (Or others can recommend me a better way to
deal with old volumes), so here goes:
Pruning all clients
Before you start cleaning old volumes, it might be wise to ensure that all
volumes are pruned before cleaning, so you maximize the number of volumes you
are going to delete.
Pruning all clients
1234567
#!/bin/bashclients=`mysql -e'select Name from Client ORDER BY Name ASC;' bacula | tail -n+2`for client in `echo$clients`doecho"prune files client=${client} yes"| bconsole
done
Checking the number of volumes to be purged
Using list volumes in bconsole you can check the status of all volumes known to bacula.
I’m merely interested in the number of volumes that are currently marked as purged:
This resulted in a list of thousands of volumes. (We’re running, full, incremental and diff backups, so the numbers stack up). Time to get rid of them.
Removing purged volumes from the catalog and deleting them
Using this script I’ve removed all purged volumes from the catalog,
after which they were physically deleted from the disk, freeing up
precious space for more recent backups.
Removing volumes that are missing from the catalog
Somehow I also ended up with some volumes on the disk that were not
present in the bacula catalog at all. In my opinion these could be
cleaned up as well, hence:
Deleting volumes that are not present in the catalog
123456789
#!/bin/bashcd /mnt/bacula/default
for i in `find . -maxdepth 1 -type f -printf "%f\n"`;doecho"list volume=$i"| bconsole |if grep --quiet "No results to list";thenecho"$i is ready to be deleted" rm -f /mnt/bacula/default/$ifidone
Finishing up
To prevent full disks these tasks should be scheduled using cron and run daily (or at least weekly) to keep your disks and catalog lean & clean.
Other script
for volname in $(echo "list media pool=File" |bconsole | cut -f 3 -d '|'
| tail -3 | tr -d " " | grep -v -e "+-----"); do echo purge
volume=$volname |bconsole; done
If your BBB server behind the NAT uncomment the line externalAddress=10.20.30.40 in the /etc/kurento/modules/kurento/WebRtcEndpoint.conf.ini file and replace ip with your external IP address. This is worked for me! Fuente: https://github.com/bigbluebutton/bigbluebutton/issues/6797
SSH into the server
SSH into the server running your HTTP website as a user with sudo privileges.
Enable EPEL repo
You'll need to enable the EPEL (Extra Packages for Enterprise Linux)
repository and make sure you follow all instructions for your system,
including enabling any other recommended repositories that may be
required.
Follow these instructions at
the Fedora wiki to enable EPEL.
Install Certbot
Run this command on the command line on the machine to install Certbot.
sudo dnf install certbot python3-certbot-apache
Choose how you'd like to run Certbot
Either get and install your certificates...
Run this command to get a certificate and have Certbot edit your Apache configuration
automatically to serve it, turning on HTTPS access in a single step.
sudo certbot --apache
Or, just get a certificate
If you're feeling more conservative and would like to make the changes to your Apache
configuration by hand, run this command.
sudo certbot certonly --apache
Set up automatic renewal
We recommend running the following line, which will add a cron job to the default crontab.
Confirm that Certbot worked
To confirm that your site is set up properly, visit https://yourwebsite.com/ in your browser and
look for the lock icon in the URL bar.
If you want to check that you have the top-of-the-line installation, you can head to
https://www.ssllabs.com/ssltest/.